Showing posts with label Heidi Swapp. Show all posts

Monday, June 18, 2012

Create with Polaroids Challenge: Here Come the Brides

 One of the challenges Two Peas in a Bucket hosted for National Scrapbooking Day was to create a layout using those oh-so-popular Polaroids.  I love the Polaroid look, and have used the Polodroid app to turn several photos into the Polaroid look.  This time I used some Crate Paper and Silhouette cut frames to frame a print I cropped and some paper.

When we were in Prague, we saw many wedding couples having portraits made in front of the Astronomical Clock.  But one day we were surprised to see a whole group of brides there, and no grooms.  On closer inspection, most of the girls' dresses were being held in with clothespins and clips.  Apparently these Japanese ladies had paid for the opportunity to play bride for the day!

Here Come the Brides


Supplies: American Crafts cardstock, Thickers (Vera vinyl white); WRMK Sewn Cardstock (Buttercup); Lily Bee Memorandum (Payday); The Paper Studio printed vellum; October Afternoon 5 & Dime; Basic Grey Blush (Admire), Junebug; Cosmo Cricket Tiny Type, Circa 1934;  Heidi Swapp mask (dots); Crate Paper diecutsGlimmer Mist; Silhouette shape (Instant Photo Frame Square); Jenni Bowlin Ink (Lemon Drops, Chili Powder, Soap Powder); VersaMark ink; Clear Tops Embossing Powder (Ultra Deep Snow Fall); Lawn Fawn washi tape; Studio Calico Stamps (Adventure); Studio AE for Technique Tuesday (The Observant Traveler, Today You)

Monday, April 16, 2012

Husbands: Do They Ever Really Grow Up?

******************************
Congratulations to the winner of the Ella Publishing Spring Training Event!  Julie (Mowhouse), please contact me to claim your prize!
******************************

I love my husband, I really really do.  But most days I think I'm married to a 12 year old in a 42 year old body.  Of course, he informed me that all men are perpetually 12 years old.  He has his Star Wars "collectibles" and his Legos, and he loves playing with 4 wheelers and trucks and tractors on his parents' farm!  Maybe I should've done this layout about me being married to Peter Pan!

Country Boy at Heart


The star embellishment started out looking like this:


But the "3" brad didn't really fit with the feel of the layout.  I simply picked another brad from the card that was similar in color and size and swapped them out.  Just another way to stretch your supplies to make them work for you!


Supplies:  My Minds Eye Miss Caroline Dilly Dally (6x6 paper padAdventures Fair,  Best VinesCelebrate brads), Dolled Up (Cute Quaint, Cute brads), On the Bright Side (Grey Wood), Stella and Rose Gerty Girly Doily Stamps, Follow Your Heart Be Amazing Chipboard, Lost and Found Union Square Moments buttons; DCWV Cardstock; Heidi Swapp Color Magic Banner Delights; Martha Stewart Home Office Brown Kraft Labels, Textured Labels, punch; American Crafts Thickers; Cosmo Cricket tiny type; Tim Holtz Tissue Tape; Staz On ink; Jenni Bowlin ink; Glimmer Mist Chalkboard Mist

Monday, April 2, 2012

Rhymes with Orange

I never really realized I had a color nemesis until I started this layout.  You see, I'd been watching a Glitter Girl episode about picking papers and not picking the most dominant colors, so I wanted to avoid green and blue for this page.  When I printed the journaling card with the orange arrow, I knew that color would work well with the photos.  But I think this is my first and only orange layout. It's a color that doesn't always work, but I think in this case it really works!  The Crate Paper paper let me pull in the greens and blues as accents, which helped it all be cohesive.

Englischer Garden


Supplies: Cosmo Cricket Ever After (orange swirl and white with orange blossoms); Lily Bee Catching Fall (Flannel Sheets); Crate Paper Portrait (Bouquet), Chipboard stickers, Phrases stickers (Toy Box, Restoration), Rub Ons (Restoration), Border StickersFun Day Journaling Card by Marcy Penner; K and Co Smash Pad, die cuts (Julianne Vintage); Adorn It Sticker Paper (Velvet Tan Dots); Jillibean Soup Kraft mini alpha; My Minds Eye Diecut Lost and Found Two Rosy "Ordinary" Title; Heidi Swapp Flocked Rub Ons; Pink Paislee Parisian Anthology dimensions corrugated elements; Recollections Adhesive Rhinestone flourish; Making Memories Metal Sayings (family); Bo Bunny Layered Chipboard; Studio AE for Technique Tuesday ("Are we there yet"); Jenni Bowlin Ink (Seed Packet, Weather Vane); Tim Holtz Distress Ink; Martha Stewart punches (Starburst, Quilted by the Each)

***For 12% off any purchase at Stop and Scrap, use the code FEATHERS***  

Friday, February 10, 2012

Charles Bridge

When I start a scrapbook page, I tend to pull out papers that pull from colors in the photos.  There is tending to be a lot of yellow and red pages about our time in Prague.

Charles Bridge


Supplies: American Crafts cardstock, minimarks, thickers; Basic Grey Porcelain Doulton; Crate Paper Portrait Pearls, Something Blue; border sticker; Cosmo Cricket Circa 1934 Ginger, stickers; Studio Calico sticker; Heidi Swapp chipboard alpha; Colorbok diecuts; Pink Paislee wood shapes; foo fa la rub on ; Bo Bunny dimensional stickers; Martha Stewart twine; Tattered Angels Chalkboard Spray 

Monday, July 11, 2011

What I’ve learned from Christine Middlecamp


Note to Christine Middlecamp -- if you are ever to stumble on this post, two things. a) I promise I’m not some wacked-out stalker, and b) I hope it’s OK that I feel like I can call you by your first name, since we’ve never met or anything.

It’s no secret that Christine Middlecamp is one of my most favorite, inspiring scrapbookers to follow.  I stumbled on her infamous Doily Tutorial about a year ago now, and showed you my version in my very first post

Spend some time exploring Christine’s blog. See for yourself how she is the master (mistress?) of the layering technique.  Always clean and simple, never overly busy, and it doesn’t distract from the photos.  And no, Christine isn’t paying me for this post!

In the year I’ve been following her blog, I’ve tried to incorporate some of her style and technique into my own scrapbooking.  I don’t favor the light, airy tones she does, but I’m attempting to incorporate aspects of her techniques.  Here’s some of what I’ve learned from Christine.

1. Layer, layer layer

Christine is the absolute queen of layering, in my humble opinion.  Pull from your paper and embellishment stash, and rearrange before you glue them down.  Pile on and edit away.  Look at your stash in a new way.

2. Pop dots are your friend


Use pop-dots to (pardon the pun) “pop’ elements off the page.  This adds separation and dimension to the layers.

3.  Make your own 3D embellishments


This is one of Christine’s signature moves.  Use paper, coordinating stickers, brads, diecuts, buttons, pearls, and/or bling to layer up (using pop dots, of course) and make your own customized embellishments.  Use those die cutters or decorative edge scissors and cut scalloped and plain circles to peak from behind a brad.   When in doubt, see #1.

4.  Use what you’ve got…


These days especially we are all looking to be a little frugal.  And if you’re anything like me, you have stash guilt and hate to waste anything, so you have quite a stash.  Look through what you have.  Look at it with new eyes.  And…

5. …and make it work


You can adapt a lot of things to make them work for your project with a little time and creativity.  The sticker above originally said “’10’ things I love!”.  I used another small blue sticker from the same sheet, and cut a small “2” from some coordinating patterned paper to make a phrase that I could use.


6. Die-cuts are your other friend


You know them…all those beautiful die cut shapes that you have.  You want to use them, but you don’t know what to do with them, especially all the really tiny ones.  Diecuts make great foundations and details in layers, making them visually interesting.

7. Don’t be afraid to use your scissors

Christine Middlecamp is not one of those scrappers who is afraid to cut up their stash.  Got a rub on that’s just too big?  Cut it up.  Only like the border of a journaling card?  Cut it up.  Got a sticker that would make a perfect border?  Cut it up.  Again, these little details really add to the overall visual.

8. Black cardstock – your OTHER new friend

Ms. Middlecamp loves to outline many elements with black cardstock.  Use up those scraps to frame your elements and really make them pop.

9.  Incorporate buttons, brads, and bling in ways you never imagined


Who would think to put a rhinestone or pearl on top of a button?  Not me, but its something Christine Middlecamp does all the time.  Topping off other elements with brads or buttons make a great finishing touch.

10.  Windows, chipboard, transparencies…the list goes on

One really neat thing I learned from the Doily Project was using transparencies or paper with chipboard frames and rubons, brads, or stamps to create little “windows”.  These elements are really nice in a cluster.  I didn’t use them in this particular layout, but I need to use them more.

--------------------------------------------

2 Things I Love


Sketch: Creative Scrappers Sketch 163

Supplies: Cosmo Cricket patterned paper (Circa 1934 – Chaplin, Astaire, Gable, Garbo), sentiments, stickers; DCWV cardstock; October Afternoon mini letters, rubon (honey pie); Basic Grey button; K & Company die cuts, paper tape, bling; Kaisercraft pearl; Maya Road pin; Crate Paper border sticker; Webster’s Pages sparklers (natural tint); Jenni Bowlin Bingo Card; Tim Holtz Distress Ink, tissue tape; Heidi Swapp rubon (fuzzy – love)

Monday, May 30, 2011

Channeling Stacy Julian

I guess I picked something up from Stacy Julian on Episode 67 of the Paperclipping Roundtable.  I went home and picked up some photos of Mark and his niece and nephews and scrapped them.  The trick is, these photos from two different places, at least 6 or 7 years apart, but they show the relationship, tell the story of Mark being an uncle.  But I don’t scrap this way!!!  Stacy, you are rubbing off on me!

I also finally broke into my stash of Crate PaperRestoration”.  This may be my most favorite line ever.  The layout illustrates that you can get masculine layouts from frilly, girly paper with careful choices.  I feel like it still needs something, though.  Distress stickles, maybe?

Being Uncle Mark


Patterned Paper, chipboard shapes, and stickers: Crate Paper; Buttons: Basic Grey; Twine: Martha Stewart; Chipboard letters: American Crafts, Heidi Swapp; Letter Stickers: Making Memories

Sketch: Your Scrapbook Stash May 7th sketch

Wednesday, November 17, 2010

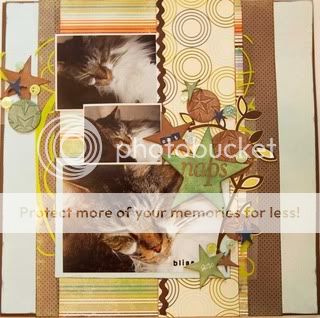
I Wish I Had a Cat's Life


Cat Naps


From Nic Howard's sketch for Color?  Or is it Colour? class for Big Picture Classes.

Products Used:
Scenic Route - patterned paper; My Minds Eye - patterned paper (ancient slab); American Crafts - cardstock; Hambly - transparency; Technique Tuesday - chipboard; Basic Grey - chipboard, stickers, sticker letters; Tim Holtz - grungeboard; Cosmo Cricket - sticker letters; Sakura - souffle pen; Heidi Swapp - rubon; Cat's Eye chalk ink; Versa Magic ink

Tools Used:
Cuttlebug - embossing folder

Monday, November 1, 2010

Today's Post is Brought to You by: the Color Red

The Color!  Or is it Colour?  class over at Big Picture Classes is off to a great start!  Our first color assignment was red, and it was suggested we use it as an accent on a more neutral page.  I love red, so this one wasn't a great challenge for me, but it was a challenge to find only red and neutral embellishments in my stash!

Ozzy Magnus


Products Used:  DCWV - Cardstock; Jenni Bowlin - patterned paper, chipboard buttons; Autumn Leaves - patterned paper; Creative Imaginations - stickers; Heidi Swapp - rub on letters; My Minds Eye - transparency; K&Company - transparency; Tim Holtz - grungeboard; Prima - flowers; buttons, tag, crepe paper, flowers and clear embossing powder from stash; Stampabilities ink pad.

Tools used: Tim Holtz Tiny Attacher

LinkWithin

Related Posts Plugin for WordPress, Blogger...